 Action Footage Player
Photos from your video
Pause on the moment. Keep it as a photo.
The turtle turned to the camera for one second. Pause there, frame it like a photo, and press Enter. You get a clean, steady photo at the video's full resolution, that shows right on any screen and brighter on HDR ones.
What you get
Better than a screenshot of the video.
The photo isn't taken from the screen. The player renders that frame again from the original file, with everything a still needs.
-
Live Photo supportedMotion Photo supported
A Live Photo: the photo with 3 s of video, as an iPhone takes them. Android's own kind, the Motion Photo, is supported too.Android's Motion Photo: the photo with 3 s of video inside, as Android phones take them. The Mac app also makes Apple's Live Photos. Or a still alone, if you prefer.
-
Clean
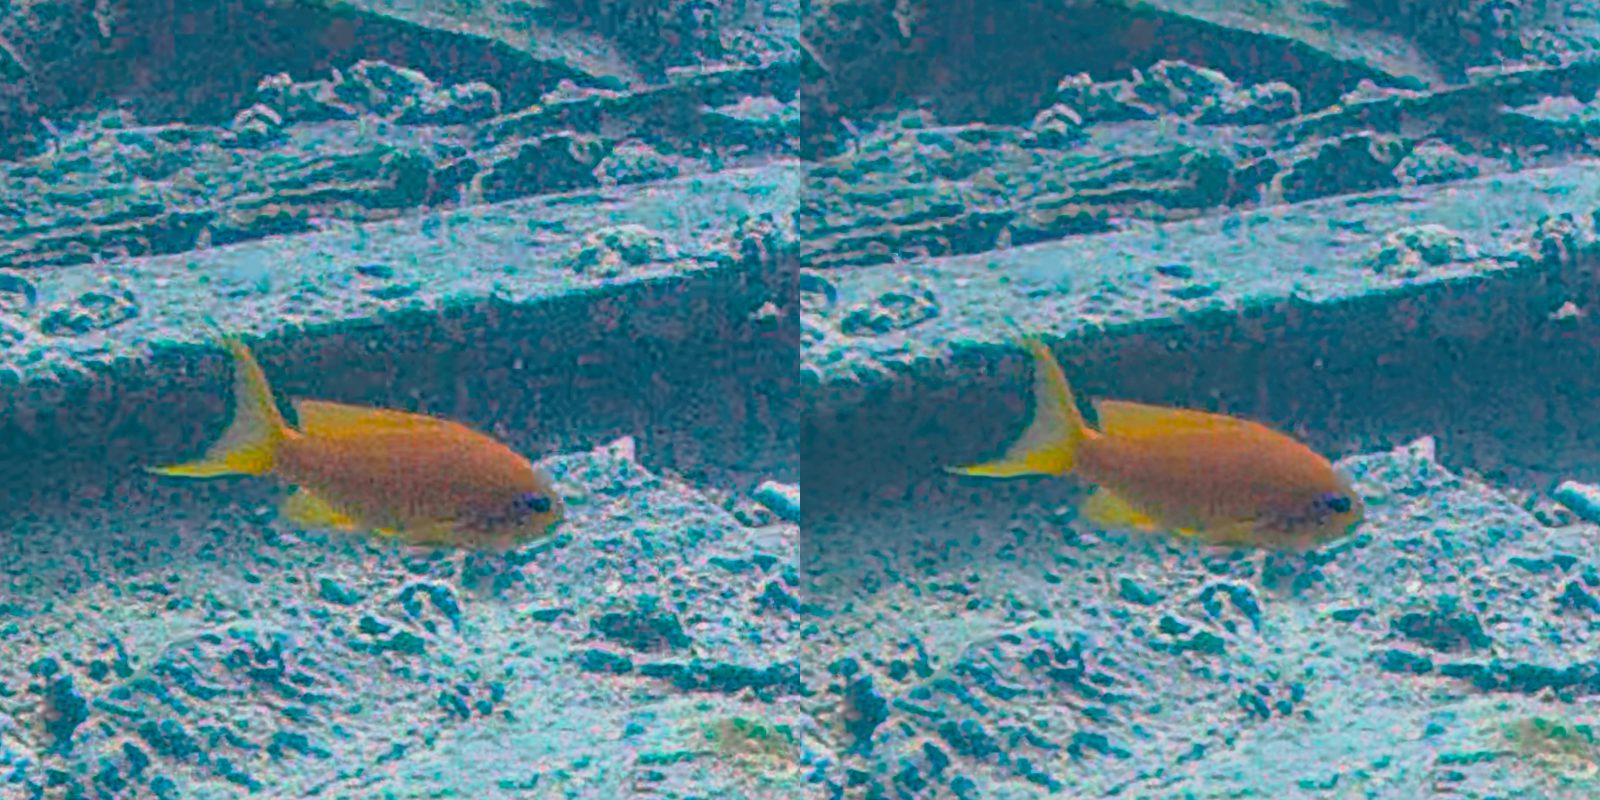
The sensor's noise in dim light, deep under water or at dusk, mostly goes: temporal noise reduction rebuilds the frame from the frames on each side of it. The detail stays.
-
Steady and level
Stabilized as it plays. On a stabilized clip you can also turn the camera a little and level the horizon, before you save.
-
Framed like a photo
16:9, 4:3, square, 4:5 or 3:4 for a feed, 9:16 for a story, or the video's own shape. Framing knows the lens, so a face from the corner isn't stretched in the middle of the photo.
-
Full resolution
The video's own size, whatever the playback settings: from a 4K clip, 3840 × 2160, or 2160 × 2160 square.
-
Right on every screen
An ordinary screen shows the look you chose. An HDR screen shows the same photo brighter, with the light of the HDR version.
How it works
Pause, frame, save.
Two of the steps are optional: pause and press Alt+s, and you already have a clean photo of the whole picture.
-
Pause on the moment
A moment later the paused frame is cleaned up on screen. It's on by default; Ctrl+p turns it off and on again.
-
Look at it at full size
Optional. Ctrl+f shows the paused frame at the video's own resolution, to check the focus and the detail.
-
Frame it
Optional. c puts a frame over the video. Choose its shape, zoom in or out, turn the camera, level the horizon.
-
Save it
Enter in the frame, Alt+s at any time, or Save the frame as a photo in the side panel. It saves in the background while you keep watching.
On a Mac, Alt is the Option key (⌥) and Ctrl is Control.
Clean frame
One frame, rebuilt from eleven.
A single video frame is noisier than a photo, the more so in dim light: deep under water, at dusk, indoors. That grain is the camera's sensor. So when you pause, the player waits a moment (0.4 s), then cleans the frame with temporal noise reduction: it rebuilds the paused frame from itself and the 5 frames on each side of it.
Each of those frames is first moved onto the paused one, using the motion between them. Then they are combined. The sensor's noise is different in every frame, so it mostly averages away. The reef, the fins and the faces are the same in every frame, so their detail stays. The on-screen message says Cleaning up the frame…, and it takes about a second for 4K.
It needs the clip to be stabilized: the stabilization is what knows how the camera moved between the frames. It's called Temporal denoise in the side panel, and it stays on for the next clips until you turn it off.
The paused frame at full size
To play smoothly, the player may show the video smaller than it was recorded (the playback size and frame-rate settings in the side panel's Performance & Quality part). A paused frame then shows less detail than the file has. Ctrl+f renders the paused frame again at the video's own resolution, once, and cleans it in the same pass. To have that after every pause, set Paused frame to Full size in the side panel.
This is only for looking. A saved photo is always rendered from the file at full resolution, with or without Ctrl+f.
Framing
Turn the camera, not just the crop.
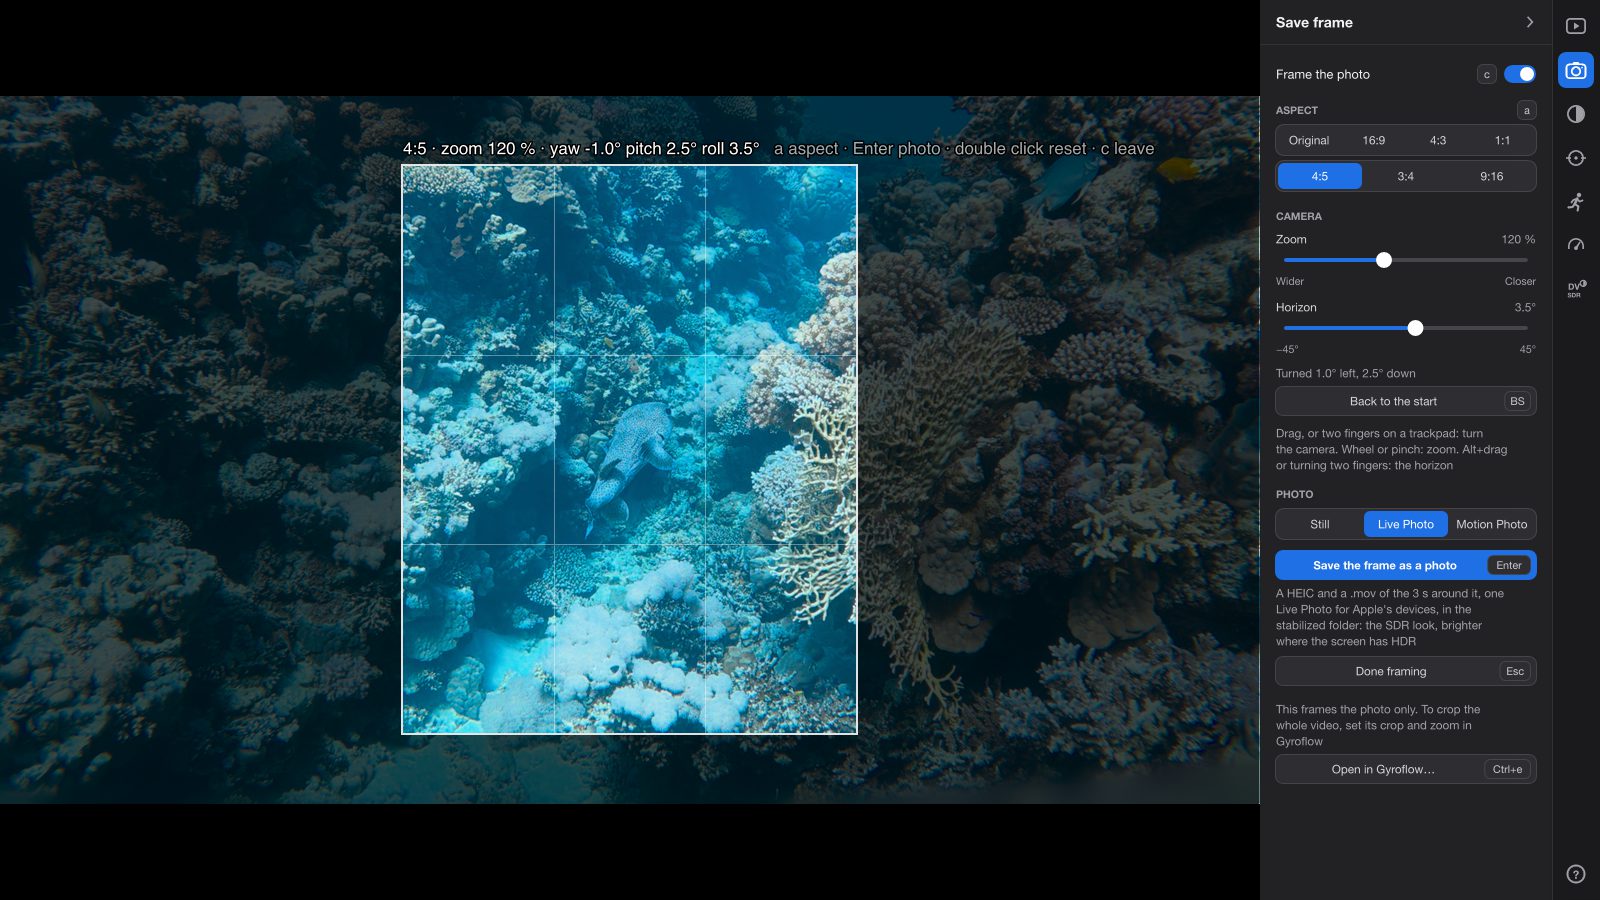
Press c for Save frame. A frame appears over the video, the area outside it is dimmed, and thirds lines are drawn inside it. The side panel opens on its Save frame part.
On a stabilized clip
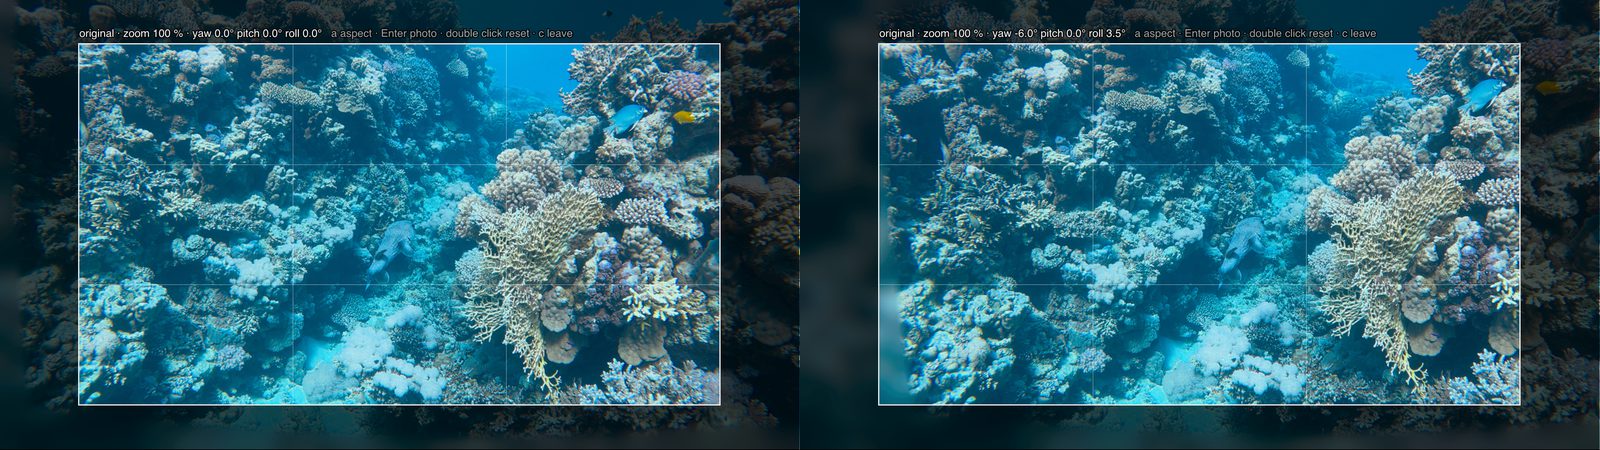
When the player stabilizes a clip, it already renders a virtual camera that looks where the stabilization decides. In Save frame, you take over that camera, like a camera on a tripod head:
- Drag to turn it left, right, up or down. The point under the mouse stays under the mouse. Two fingers on a trackpad do the same.
- Wheel or pinchor Ctrl+wheel (a pinch on a touchpad) to zoom: a wider or closer angle of view.
- Alt+drag or turning two fingers to level the horizon, up to 45° either way.
- Double click or Backspace to go back to the start.
After each move, Gyroflow, the stabilization engine, renders the frame again looking that way. So a turn can bring in a part of the scene that was outside the picture on screen: it's rendered, not just cut out. And it's rendered through the lens, as Gyroflow knows it. A face caught in the corner of a wide shot is stretched there by the lens; turn the camera to bring it to the middle of the photo, and it looks as it should, not as a cut-out, enlarged corner would. The label above the frame shows the shape, the zoom and how far the camera is turned, for example 4:5 · zoom 120 % · yaw 6.0° pitch -2.0° roll 3.5°.
On a clip that isn't stabilized
Without the camera's motion data, or with the stabilization off (Ctrl+g), there is no camera to turn. Dragging moves the picture itself, and zoom scales it, from 50 % to 800 %. There's no horizon to level.
The shape
a goes to the next shape, Shift+a to the previous: Original, 16:9, 4:3, 1:1, 4:5, 3:4, 9:16. The frame stays centred, at most 80 % of the video either way, so there's room around it to see what you leave out.
Press Enter to save, c or Esc to leave. While you frame, the on-screen picture isn't cleaned up, since every turn renders it again. The saved photo is cleaned all the same.
The photo file
One photo for every screen.
The photo is the look you chose, as an ordinary screen shows it, with a gain map inside for HDR screens.
A gain map, in plain words
HDR (high dynamic range) screens can show highlights much brighter than an ordinary screen's white: the sun on the water, a dive light. Log and HLG video keep that light; an ordinary photo can't.
A gain map is a small second picture stored inside the photo. It says how much brighter each part of the photo gets on an HDR screen. A screen or an app that doesn't know about gain maps shows the normal photo. One that does shows it brighter, up to the HDR (HLG) version of the frame, with highlights up to about five times brighter than the photo's white.
HEIC on a Mac, JPEG elsewhere
On a Mac, the photo is a HEIC, the photo format iPhones use, with its gain map in the format Photos reads on macOS 15 and iOS 18. Making the gain map needs macOS 15 or later; on macOS 12 to 14 the HEIC has none, and shows the same everywhere.
On Windows, it's an Ultra HDR JPEG: an ordinary JPEG, which every app opens, with the gain map inside in the format Android phones and Chrome read.
…_8.00s.heic…_8.00s.jpg
What the picture is, look by look
The rule is "export what you see": the photo's picture is what an ordinary screen shows of the look that's playing. Looks are explained on the Log footage page.
| Look playing | The photo's picture | Gain map |
|---|---|---|
| SDR, camera maker's LUT | DJI's own conversion of D-Log M (a LUT, a color table) to an ordinary picture | to HLG |
| SDR, NBCU | NBCU's conversion of the HLG to an ordinary picture, a neutral standard one | to HLG |
| HDR, HLG | The HLG as macOS shows it on an ordinary screenNBCU's conversion | to HLG |
| SDR tone mapped from HDR by mpv | NBCU's conversion, not mpv's | to HLG |
| HDR, HLG+DV and SDR, HLG+DV (Mac) | NBCU's conversion, not Dolby Vision's | to HLG |
| Log off (L), or a clip recorded in SDR | the frame as recorded | none: a plain photo |
A clip recorded in HLG follows the same rows. A clip recorded in PQ HDR can't be saved as a photo.
Size
The stabilized view at the video's own resolution, cut to the frame. At the starting zoom, the frame keeps all the video's pixels along its tighter side: from a 4K clip, 3840 × 2160 in the original shape, 2160 × 2160 square, about 1214 × 2160 in 9:16. Zooming out keeps that resolution down to about 62 %. Zooming in past 100 % enlarges the video: it adds no detail.
Cleaned, stabilized, at quality 92
The photo is rendered from the original file, stabilized as it plays, with Save frame's camera and frame, and cleaned from the 5 frames on each side, unless Ctrl+p has turned Temporal denoise off. About 8 s for a 4K photo.
Date and camera
The date and time the frame was shot (the clip's start plus the frame's time, to the second) and the camera's make and model. For DJI clips the start comes from the file name, so from the camera's clock. No GPS position is written, even when the camera recorded one.
Where it goes
Into the project's _Stills folder, beside _Exports, so the pictures are apart from the videos. A clip that isn't in a project gets a stabilized folder beside it. A message on screen and a notification say Photo saved, with the file's name.
- _Stillsin the project's folder
- DJI_20261022152937_0069_D_8.00s.heica photo of the frame at 8.00 s: a still, or the photo of a Live Photo
- DJI_20261022152937_0069_D_8.00s.movits 3 s of video: the two make one Live Photo
- DJI_20261022152937_0069_D_8.00s.jpga still of the frame at 8.00 s
- DJI_20261022152937_0069_D_8.00s_2.MP.jpgthe same frame saved again, as a Motion Photo: nothing is overwritten
Live Photo and Motion Photo
Live Photo supported. Android's Motion Photo too.
A photo that moves when you touch it, like the ones phones take. The 3 s around the frame (1.5 s on each side) are exported just as Shift+E would export them, steady and in the same look, with the same frame and camera as the photo.
Live Photo Mac app
A HEIC and a .mov with the same name and a shared ID inside, made the way Apple's Photos expects a Live Photo, so the two go together as one. The video is HEVC, at the clip's own frame rate, with its sound. In the Dolby Vision looks, the video keeps its Dolby Vision.
Motion Photo Mac and Windows
One file, …_8.00s.MP.jpg: an Ultra HDR JPEG with the video stored inside it, after the photo, the way Android cameras write Motion Photos. Apps that don't know the format show the photo.
Still
The photo alone, without the video: a HEIC on a Mac, an Ultra HDR JPEG on Windows.
The video's long side is at most 1920 pixels, and it carries the clip's first sound track (DJI cameras record two). Near the clip's start or end it's shorter. If the video part fails, the photo is saved on its own.
It's on by default: Live Photo on a MacMotion Photo on Windows. The Photo choice in the side panel's Save frame part changes it, and the choice is kept for next time.
Settings
In the side panel.
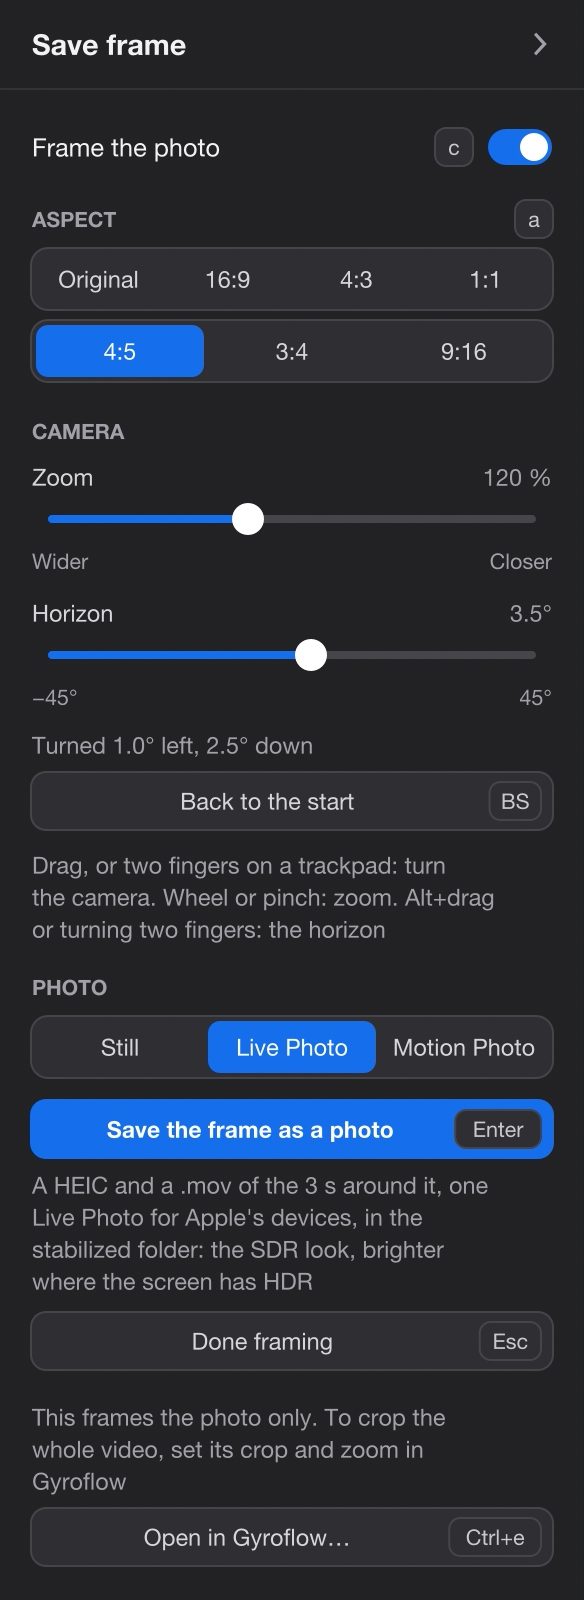
The Save frame part (the camera icon, second in the panel's row of icons) opens by itself when you press c, and the panel goes back to where it was when you leave.
Save frame
| Setting | What it does | Default |
|---|---|---|
| Frame the photo c | Shows the frame over the video. | Off |
| Aspect a | The frame's shape: Original, 16:9, 4:3, 1:1, 4:5, 3:4, 9:16. Kept until the player quits. | Original |
| Camera stabilized clips | Zoom, from Wider to Closer; Horizon, from −45° to 45°. A line below says how far the camera is turned, for example "Turned 4.2° right, 1.0° down", or "Looking where the stabilization does". | 100 %, 0° |
| Picture clips that aren't stabilized | Zoom, from Smaller to Closer. Shown instead of Camera. | 100 % |
| Back to the start Backspace | Undoes the turns, the zoom and the horizon. | |
| Photo | Still, Live Photo or Motion Photo.Still or Motion Photo. (A Mac also has Live Photo.) What a save makes. Kept for next time. | Live PhotoMotion Photo |
| Save the frame as a photo Enter | Saves it. The line under it says what you'll get. | |
| Done framing Esc | Leaves Save frame. | |
| Open in Gyroflow… or Stabilize in Gyroflow…, Ctrl+e | Save frame frames the photo only. To crop the whole video, set its crop and zoom in Gyroflow; see Stabilization. |
Outside Save frame, the panel's Clip part has the same Save the frame as a photo button (Alt+s): a photo of the whole stabilized view.
Performance & Quality
| Setting | What it does | Default |
|---|---|---|
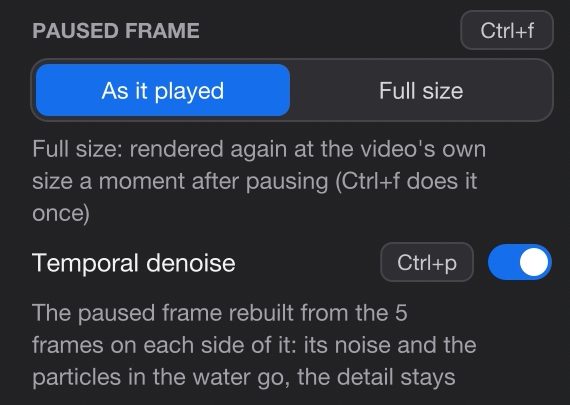
| Paused frame | As it played: the paused frame at the playback size. Full size: rendered again at the video's own size a moment after each pause (Ctrl+f does it once). | As it played |
| Temporal denoise Ctrl+p | The paused frame rebuilt from the 5 frames on each side of it, on screen and in the photos you save. | On |
In the settings file gyroflow.conf: live_photo is yes (Live Photo on a Mac, Motion Photo elsewhere), live, motion or no (stills). still_radius, still_delay and still_grain tune the clean frame on screen only: a saved photo always uses 5 frames on each side.
Keys
Every key on this page.
On a Mac, Alt is Option (⌥) and Ctrl is Control. On a trackpad, two fingers turn the camera, a pinch zooms, and turning two fingers levels the horizon.
Limits
What isn't in the photo.
- Playback-only fixes. The removal of water's color fringes (Ctrl+a) and Noise reduction (Ctrl+n) work while it plays, not in photos or exports. An under-water photo keeps the fringes the screen had removed. The depth and other readouts over the video aren't in it either.
- Three looks aren't matched exactly. In SDR tone mapped from HDR by mpv and in the two HLG+DV looks, the photo's picture is NBCU's conversion, close to but not the same as what the screen shows. The trims set in the Dolby Vision panel don't reach the photo. In the mpv tone-mapped look, the 3 s of video of a Live or Motion Photo are HDR (HLG), and a Motion Photo's video in the HLG+DV looks is HLG without Dolby Vision.
- Turning the camera needs stabilization. On a clip without motion data, or with Ctrl+g off, Save frame only moves and scales the picture, and the horizon can't be levelled. The clean frame needs stabilization too.
- Zooming in adds no detail. Past 100 %, the photo is an enlargement of the video.
- Clean-up is fixed for photos. A saved photo always uses 5 frames on each side; the
gyroflow.conftuning applies on screen only. Near the start or end of a clip there are fewer frames to use. - No location. Only the date, the time and the camera are written. On Windows, the time of a clip that isn't DJI's is in UTC, not your time zone.
- Live Photo needs the Mac app. On Windows, choose Motion Photo. On a Mac set up with your own mpv instead of the app, photos are Ultra HDR JPEGs, and Live Photo becomes Motion Photo. The video runs at the clip's frame rate, for example 59.94 frames a second.
- HDR in the photo needs macOS 15 or later on the Mac that saves it; earlier versions save a plain HEIC. Clips recorded in PQ HDR can't be saved as photos. SDR clips, and log with the log conversion off, give a photo without a gain map.
Questions
About photos.
Why not just take a screenshot?
A screenshot is the size of your screen, of the frame as it played, with its noise, and an ordinary picture. The photo is rendered from the file: full resolution, cleaned from the frames around it, framed, and with a gain map for HDR screens.
Will it look right on a screen without HDR, or in a chat app?
Yes. The photo itself is the look as an ordinary screen shows it. The gain map only adds light where the screen and the app can show it; anywhere else it's ignored.
Can I keep watching while it saves?
Yes. The photo is made in the background, about 8 seconds for a 4K one, and a little longer for a Live or Motion Photo, whose 3 s of video are exported too. A message and a notification tell you when it's saved, with the file's name, which carries the frame's time, for example _8.00s.
Can I crop the whole video like this?
No, Save frame is for photos. To crop or zoom a whole clip, set its crop and zoom in Gyroflow (Ctrl+e); the player then plays and exports it that way. See Stabilization.
Is my original video changed?
No. The photo is a new file; the video is only read.
Try it
Pause on your best second.
Free, no account, and your footage stays as it is.